
First of all download PIXresizer from here http://bluefive.pair.com/PIXresizer.zip (Just click the link)
It's a .zip file so double click it and then double click the file called "setup" to install.
Now on your desktop (or wherever you like) make two new folders, name one "Big bastard photos" and the other "Lovely little photos".
Put the original photos from the camera into the "Big bastard photos" folder.
Open PIXresizer from the start menu / programs menu, woteverrrr.
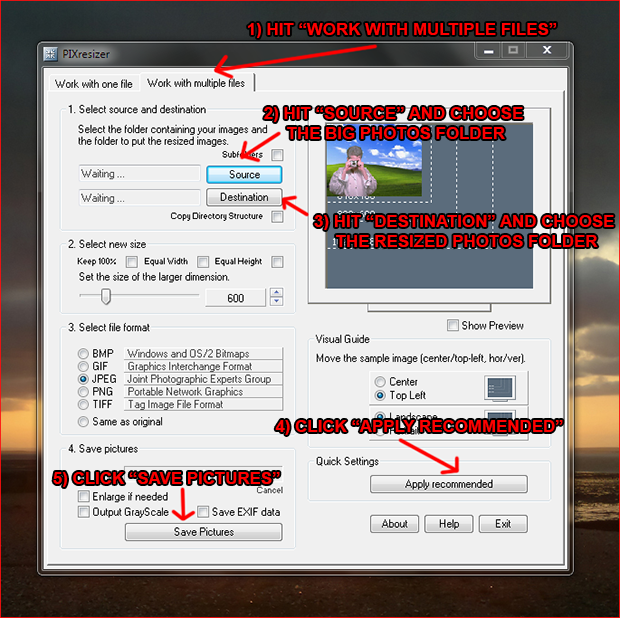
1) At the top of PIXresizer there is 2 tabs, one saying "Work with one file" the other saying "Work with multiple files".
We want to Work with multiple files today so click it.
2) Click where it says "Source" and find the "Big bastard photos" folder, hit "OK" when done.
3) Click where it says "Destination" and find the "Lovely little photos" folder, hit "OK" when done.
4) Make sure you've clicked "Apply recommended" near the bottom right corner.
5) Now wave your original limited edition Harry Potter wand and say "HEYFUCKINGPRESTO!!!" (you could also use a chopstick or pencil if you do not have a wand), Click "Save Pictures" and you now have all your big ass photos converted to sexy little ass photos sitting in the "Lovely little photos" folder waiting to be used like whores.
Here is a nice easy to follow picture showing PIXresizer.
I'd just like to quickly say thanks to Bluefive Software (the makers of PIXresizer) for creating such a great piece of software. Simple to use, does what it says on the tin and 100% FREE with NO ads or spyware!!!
For your own safety please only download PIXresizer from the official Bluefive website @ http://bluefive.pair.com